Second Battle of Gaza
|
|
The Second Battle of Gaza, fought in southern Palestine during World War I, was the second attempt mounted by the British to break the Turkish defences along the Gaza-Beersheba line. The first Battle of Gaza of March 26 was a fiasco for the British after the commander, General Charles Dobell, made the decision to withdraw when his troops were in a position to seize victory. Turkey, encouraged by victory during the first battle, resolved to stand upon the Gaza-Beersheba line so that by the time the British were prepared to renew their assault, the Gaza fortifications were even stronger than before. The battle became another costly defeat for the British and resulted in the dismissal of the Eastern Expeditionary Force, General Archibald Murray, who had conducted the campaign in Egypt and Palestine since January 1916.
| Contents |
Prelude
In their communications with the War Office in Britain, Generals Murray and Dobell, commander of the Eastern Force, had falsely portrayed the first battle of Gaza as a British success and gave every indication that a quick resumption of the offensive would have immediate and positive results. Dobell planned a typical Western Front attack with two days of preliminary bombardment followed by a frontal infantry assault on the enemy trenches. The experienced combat commanders, General Philip Chetwode, commander of the British Desert Column, and General Henry Chauvel, commander of the Anzac Mounted Division, were less optimistic about the chances of breaking the Turkish line. In fact, on the eve of the attack one British commander concluded his briefing thus:
- "That, gentlemen, is the plan, and I might say frankly that I don't think much of it"
The infantry component of General Dobell's Eastern Force had expanded since the first battle to four infantry divisions; 52nd (Lowland), 53rd (Welsh) and 54th (East Anglian) divisions plus the recently formed 74th (Yeomanry) Division which was made up of brigades of dismounted cavalry serving as infantry. The mobile component remained the Desert Column which comprised the Anzac Mounted Division and the Imperial Mounted Division plus the Imperial Camel Corps Brigade. The 74th Division and Anzac Mounted Division would remain in reserve during the battle.
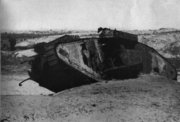
In keeping with the "Western Front" flavour of the battle, the British introduced poison gas and tanks to the eastern battlefield for the first time. Two thousand gas shells and six tanks were available. While the tanks were certain to be deployed, doubts remained about whether to use gas though the concerns were operational rather than humanitarian.
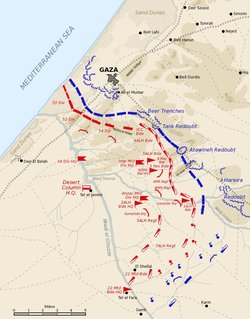
It was estimated that the Turkish forces occupying the Gaza-Beersheba defences numbered between 20,000 and 25,000. The defences had been strengthened since the first battle. The west flank of the line was defended by the fortress of Gaza. To the east the line was held by a series of redoubts located on ridges, with each redoubt providing support for its neighbours. The low ground between the redoubts was unoccupied or lightly held. From west to east these redoubts were "Tank", Atawineh, Hareira and Sheria. Beyond Sheria the defences were thin as far as the township of Beersheba but the lack of water on the approaches to this region made the Turks consider anything other than a cavalry raid unlikely.
Attack on Gaza
The resumption of the attack on Gaza effectively began on the morning of April 17 with the start of the preliminary bombardment of the fortifications which would last for two days. British heavy guns south of Gaza were joined by naval gunfire from the French cruiser Requin and two British monitors (M21 and M31). While the bombardment was heavy by the standards of the Sinai and Palestine battles so far, it was weak in comparison to the standards of the Western Front and had limited effect on the Gaza defences. On the morning of April 19, as the infantry attack was about to commence, the guns concentrated on the Ali Muntar strong point, south east of Gaza. This included the firing of gas shells for the first time.
One result of the prolonged bombardment was to provide the Turks with ample warning that a major attack was imminent, giving them plenty of time to finalize their defences. Another deficiency in the British plan was that all their artillery was concentrated on bombarding the defences, leaving no guns available for counter-battery work against the Turkish artillery which was therefore uninhibited in its shelling of the British line.
The infantry had advanced to their starting position in sight of Gaza on the morning if April 17. There they remained under fire until the attack started on the morning of April 19. One of the tanks was destroyed while in support of the infantry.
At 7.15 am on April 19, the 53rd Division advanced on the extreme left (west) of the front, aiming for the sand dunes between Gaza and the Mediterranean shore. This was followed shortly after by the 52nd Division (155th and 156th Brigades) attacking in the centre against Gaza and Ali Muntar and the 54th Division (161st and 162nd Brigades) attacking on the right between Gaza and the "Tank" Redoubt.
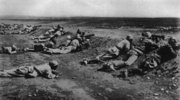
All along the front the infantry were brought to a halt well short of their objectives while suffering heavy casualties from shrapnel and machine gun fire.
Tank Redoubt
The five surviving tanks were deployed at various points along the front, rather than as a single unit. In most cases, the only discernable effect of their presence was to attract concentrated artillery fire which made their proximity perilous for the infantry. However, one tank operating to the right of the 54th Division on the front facing a strong redoubt that was to become known as "Tank" Redoubt, did enable the infantry to make their most significant gain of the battle.
Facing the Tank Redoubt was the 161st Brigade of the 54th Division. To their right were the two Australian battalions (1st and 3rd) of the Imperial Camel Corps Brigade who had dismounted about 4,000 yards from their objective. As the infantry went in to attack at 7.30am they were joined by a single tank called "The Nutty" which attracted a lot of shell fire. The tank followed a wayward path towards the redoubt on the summit of a knoll where it was fired on point blank by four field guns until it was stopped and set alight in the middle of the position.
The infantry and the 1st Camel Battalion, having suffered heavy casualties on their approach, now made a bayonet charge against the trenches. About 30 "Camels" and 20 of the British infantry reached the redoubt, then occupied by around 600 Turks who, perhaps terrified by the arrival of the tank, broke and fled towards their second line of defences to the rear.
The British and Australians held on unsupported for about two hours by which time most had been wounded. With no reinforcements at hand and a Turkish counter-attack imminent, the survivors endeavoured to escape back to their own lines.
To the right (west) of Tank Redoubt, the 3rd Camel Battalion, advancing in the gap between two redoubts, actually made the furthest advance of the battle, crossing the Gaza-Beersheba Road and occupying a pair of low hills (dubbed "Jack" and "Jill"). As the advances on their flanks faltered, the "Camels" were forced to retreat to avoid being isolated.
Atawineh
The eastern-most advance was made against the Atawineh Redoubt and the neighbouring Sausage Ridge. This line was made up, from left to right, of the Australian 4th and 3rd Light Horse Brigades and the 5th Mounted (Yeomanry) Brigade of the Imperial Mounted Division, commanded by General Hodgson. Hodgson's orders were ambiguous; he was to "demonstrate" against the Turkish positions to prevent them withdrawing reinforcements to Gaza but was also to advance strongly if the opportunity presented itself. Dobell had visions of breaking through the Turkish line on the flanks and sending his mounted reserves through. Consequently the secondary attack upon Atawineh was pushed hard and at great cost in casualties when it was not strictly necessary, especially given the failures elsewhere along the line.
The 3rd Light Horse Brigade had begun its advance before dawn and, attacking along the spine of the Atawineh ridge, managed to approach to within 800 yards of the redoubt before being sighted. However, their advance was premature so that the units on their flanks were still well behind. They managed to close to 500 yards during the day but got no further. The 4th Light Horse and 5th Mounted Brigades managed similar advances on their sectors but nowhere were the Turkish trenches reached and given the inferior position of the attackers, there was no prospect of making a successful bayonet charge.
The eastern flank of the British line was guarded by the brigades of the Anzac Mounted Division. The northern-most unit on the flank was the Wellington Regiment of the New Zealand Mounted Rifles Brigade whose front lay along Sausage Ridge. They advanced in support of the 5th Mounted Brigade.
In the afternoon the line of the Imperial Mounted Division was reinforced when the 6th Mounted (Yeomanry) Brigade came forward from where it had been in reserve. With all reserves committed, there was still no possibility of a successful assault. In fact, so unstressed was the Turkish defence that their artillery had guns to spare for counter-battery work against the horse artillery.
Conclusion
By noon the attack had faltered at all points. Any small gains made were too thinly occupied to be held for long. In most places the Turkish defenders were content to hold the British at a distance and inflict casualties as they approached. Only in the west along the coast did they mount a counter-attack to attempt to recapture a position and were defeated by the British.
At 3pm the British headquarters intercepted a Turkish message stating that the Gaza garrison was not in need of reinforcements. By this time the British had committed most of their immediate reserves to the attack so, assuming the message was not a deception, it was clear that there was no prospect of success. The first plan was to resume the attack on the following morning, by which time the 74th Division could be brought in. The attack was then postponed another 24 hours before being abandoned altogether.
The immediate British concern was that the Turks would now counter-attack but this did not eventuate. During the battle, Turkish infantry and cavalry did attempt to out-flank the attackers but were held off by the brigades of the Anzac Mounted Division. In one instance, the best part of a division of cavalry was halted by two troops of light horsemen (about 80 men).
Aftermath
| Unit | Casualties |
|---|---|
| 52nd Division | 1,365 |
| 53rd Division | 584 |
| 54th Division | 2,971 |
| Anzac Mounted Division | 105 |
| Imperial Mounted Division | 547 |
| Camel Brigade | 345 |
| Total | 5,917 |
The second battle of Gaza was a disastrous defeat for the British. They made no progress, inflicted little damage and suffered heavy casualties that they could not easily afford. The main losses were, once again, amongst the British infantry who were called upon to attack the strongest position.
For failing to achieve the promised success on the second attempt, both General Murray, Commander-in-Chief of the Palestine campaign, and General Dobell, the army commander of Eastern Force, were quickly replaced. The British War Office, perhaps hoping to avoid a repeat of the Gallipoli disaster, resolved to supply the Palestine campaign with adequate resources and capable commanders to ensure future success. Murray was replaced by the capable cavalry commander, General Edmund Allenby, whose forces were expanded to contain three full army corps; two of infantry and one mounted. These forces, on the third attempt, would be able to break the Gaza-Beersheba line and commence the drive on Jerusalem.


